> ## Documentation Index
> Fetch the complete documentation index at: https://docs.cdp.coinbase.com/llms.txt
> Use this file to discover all available pages before exploring further.
# Headless Onramp
> Build a native onramp experience with Apple Pay or Google Pay where users never leave your app.
You can get started testing the Headless Onramp API using [sandbox mode](#testing). When you're ready to go live, [apply for access](https://support.cdp.coinbase.com/onramp-onboarding) — you get production access immediately after your app is approved. This is the recommended path for Apple Pay and debit card onramp flows.
The [v2 Onramp Order API](/api-reference/v2/rest-api/onramp/create-an-onramp-order) enables you to build a native
feeling onramp experience with Apple Pay or Google Pay where the user never leaves your app. **It's the fastest onramp experience
available anywhere.** Integrating takes only three steps:
## Integration steps
Call the [Create Onramp Order API](/api-reference/v2/rest-api/onramp/create-an-onramp-order) to get a quote and a
payment link. You can fetch the list of available currencies from the [Buy Options API](/api-reference/rest-api/onramp-offramp/get-buy-options).
Load the [payment link URL](/api-reference/v2/rest-api/onramp/create-an-onramp-order#response-payment-link-url)
in a webview or iframe. The standard flow renders an Apple Pay or Google Pay button; Embedded orders may first show Coinbase-hosted OTP verification or a limits upgrade.
Subscribe to [post message events](#post-message-events) from the webview/iframe to listen for success/error messages. Use
these events to notify the user when their transaction succeeds, or what type of error they encountered and how they
might fix it.
### Choose an order experience
The [Onramp Order API](/api-reference/v2/rest-api/onramp/create-an-onramp-order) supports two experiences. Pass `phoneNumber` and `email` to receive a ready to use pay button, where your app collects and verifies the user's contact details. Omit both fields to use [embedded orders](#embedded-orders), where Coinbase collects and verifies them in the hosted experience.
## Requirements
### User verification for the standard flow
This requirement applies to the standard Headless Onramp flow, where you collect and verify the user's contact details. In [Embedded orders](#embedded-orders), Coinbase collects the required contact and identity information in the hosted session instead.
To provide an API driven native onramp experience, the user's email address and phone number must be verified before you pass them to the [Create Onramp Order API](/api-reference/v2/rest-api/onramp/create-an-onramp-order). The phone number must also be re-verified at least every 60 days.
The recommended way to meet this requirement is the [Onramp Verification APIs](/onramp/headless-onramp/verification), which let Coinbase send and validate the OTP for both channels on your behalf. You initiate a verification, submit the user's OTP code, and pass the resulting `smsVerificationId` and `emailVerificationId` to the Create Onramp Order API — no OTP infrastructure of your own required.
Alternatively, you can run your own OTP verification using a vendor like Twilio or AWS SES and attest ownership of the email address and phone number in your order request.
### US only
The Headless Onramp API is currently available for US users with valid US phone numbers. The phone
number must be a real cell phone number, not a VoIP phone number.
### Supported platforms
The onramp payment link can be rendered in:
* **iOS apps**: Via a webview in an iOS app (Apple Pay)
* **Android apps**: Via a WebView in an Android app (Google Pay — see [Android app requirements](#android-app-requirements) below)
* **Web apps**: Via iframe on your website (Apple Pay — requires additional setup, see [Web app requirements](#web-app-requirements) below)
### User gesture required
Both [Apple Pay](https://developer.apple.com/documentation/applepayontheweb/creating-an-apple-pay-session) and [Google Pay](https://developers.google.com/pay/api/web/guides/tutorial) require that a payment session be created by a user gesture. This means that the user has to physically press the pay button we
render within the webview/iframe. It cannot be programmatically triggered.
### Legal agreements
Your users must accept Coinbase's [Guest Checkout Terms of Service](https://www.coinbase.com/legal/guest-checkout/us),
[User Agreement](https://www.coinbase.com/legal/user_agreement) and [Privacy Policy](https://www.coinbase.com/legal/privacy)
prior to using Coinbase Onramp. It is your responsibility to clearly inform users that by proceeding with this payment
they are agreeing to these policies.
### Android App Requirements
To use Google Pay with the Headless Onramp in your Android app, you must:
1. **Get approved for Google Pay** — Your app must be approved by Google before Google Pay will work in production. Follow the [Google Pay publish your integration guide](https://developers.google.com/pay/api/android/guides/test-and-deploy/publish-your-integration) to create a business profile, accept the Terms of Service, and submit your app for approval.
When registering your app in the Google Pay & Wallet Console, select **gateway** as the integration type. After you submit your initial application to go live, you'll need an evidence of partnership document to share with Google Pay representatives. Reach out to your account manager, or reach out to [support](https://support.cdp.coinbase.com/) to request this information.
2. **Configure your Android WebView for Google Pay** — The Payment Request API must be enabled in your WebView to launch the Google Pay payment sheet. Follow Google's official [Using Android WebView](https://developers.google.com/pay/api/android/guides/recipes/using-android-webview) guide to add the required dependencies, intent filters, and WebView settings.
3. **Call the Create Onramp Order API** — Once your app is approved and the WebView is configured, call the [Create Onramp Order API](/api-reference/v2/rest-api/onramp/create-an-onramp-order) to get a payment link, load it in your configured WebView, and listen for [post message events](#post-message-events) to track payment status.
Your app **must** be approved by Google before Google Pay will work in production. In test environments, you can use the Google Pay test suite without approval.
### Web App Requirements
**Interested in integrating Apple Pay for your web app?** Web app integrations require additional setup steps.
[Apply for Onramp access](https://support.cdp.coinbase.com/onramp-onboarding) to get started.
The Onramp domain allowlist is separate from the [User Wallet domain allowlist](/wallets/security-and-policies/domain-allowlisting). If your app uses both User Wallets and Onramp, configure the domain in both places.
Rendering the Apple Pay Onramp payment link on your web app in an iframe requires some additional security measures to
ensure the safety of your users.
* Your web app's domain must be registered in the **Domain Allowlist** under **Payments → Onramp & Offramp** in the [CDP Portal](https://portal.cdp.coinbase.com/products/onramp)
* You must pass the domain name to the [Create Onramp Order API](/api-reference/v2/rest-api/onramp/create-an-onramp-order#body-domain) when creating a payment link
* You must verify the ownership of your domain by hosting a domain verification file (provided by us)
* Your domain must not be registered with any other Apple Merchant ID in the Apple Developer Portal
* You must include the `sandbox="allow-scripts allow-same-origin"` and `referrerpolicy="no-referrer"` attributes on your iframe
To get started with your web app integration, [apply for Onramp access](https://support.cdp.coinbase.com/onramp-onboarding). The onboarding flow will guide you through the process of verifying your domain.
You will also need to consider the different levels of Apple Pay support provided by various browsers. Safari offers native Apple Pay support, but other browsers offer a QR code experience where the user can scan the code and complete payment on their phone.
## Post message events
Payment links returned by the Create Order API are designed to be loaded within a webview so that your app can subscribe
to [post message](https://developer.mozilla.org/en-US/docs/Web/API/Window/postMessage) events emitted by our web component.
Events contain an error code and an error message. The message will be localized for the user so it can be displayed
directly in your app UI. See the documentation of your webview library for details on how to consume post message events.
**Android apps** must inject a JavaScript interface that exposes a `postMessage` function on `window.androidWebView`. This bridges post message events from the webview into your native Android code:
```javascript theme={null}
window.androidWebView.postMessage()
```
Register this interface on your `WebView` before loading the payment link so that all events are forwarded to your app.
```json Post message event structure theme={null}
{
"eventName": "",
"data": {
"errorCode": "",
"errorMessage": ""
}
}
```
### Events names
The following events are published by the payment link for both Apple Pay and Google Pay.
Emitted when Javascript is initialized and we have started fetching data required to render.
Emitted when the pay button is successfully rendered and ready for user interaction.
Emitted when an error occurred attempting to initialize the pay button. See the error message for more details. Some possible error codes are listed below.
| Error Code | Description |
| ------------------------------------------- | -------------------------------------------------------------------------------------------------------------------------------------------------------------------------------------------------------------- |
| `ERROR_CODE_INIT` | The payment link is no longer valid, call the Create Onramp Order endpoint to create a new one. |
| `ERROR_CODE_GUEST_APPLE_PAY_NOT_SUPPORTED` | The user’s browser or device does not support Apple Pay. This error can be safely ignored on web apps as the browser will fall back to rendering an Apple Pay QR code. |
| `ERROR_CODE_GUEST_APPLE_PAY_NOT_SETUP` | The user has not set up Apple Pay on their device. Prompt the user to setup Apple Pay then try again. |
| `ERROR_CODE_GUEST_GOOGLE_PAY_NOT_SUPPORTED` | The user's device does not support Google Pay. This can occur if the device does not meet Google's [minimum requirements](https://developers.google.com/pay/api/android/guides/recipes/using-android-webview). |
| `ERROR_CODE_NETWORK_NOT_TRADEABLE` | Network selected is unavailable in the region. |
| `ASSET_NOT_TRADABLE` | The asset selected is not tradable in the region. |
| `ERROR_CODE_INTERNAL` | An internal error has occurred in the service. The team will be notified to investigate. Please retry your request. |
| `ERROR_CODE_INVALID_REQUEST` | The request to create the payment link was invalid. Check the parameters passed to the Create Onramp Order API and try again. |
Emitted after the user presses the pay button if the transaction was successfully started.
Emitted after the user presses the pay button if the transaction could not be started. See the error message for more details regarding the payment failure reasons. Some possible error codes are listed below.
| Error Code | Description |
| -------------------------------------------- | ----------------------------------------------------------------------------------------------------------------------------------------------------------------------------------------------------------------------------------------- |
| `ERROR_CODE_GUEST_CARD_SOFT_DECLINED` | The user was declined by the bank. Please contact your bank or try again with a different debit card.
Users attempting to use Apple Cash will also get this error, but we cannot distinguish it from other bank decline cases. |
| `ERROR_CODE_GUEST_INVALID_CARD` | Invalid card or billing address. |
| `ERROR_CODE_GUEST_CARD_INSUFFICIENT_BALANCE` | The debit card has an insufficient balance to process the transaction. |
| `ERROR_CODE_GUEST_CARD_HARD_DECLINED` | The transaction was declined by the issuing bank of the card. |
| `ERROR_CODE_GUEST_CARD_RISK_DECLINED` | The transaction was flagged by our risk rules and is unable to proceed. |
| `ERROR_CODE_GUEST_REGION_MISMATCH` | The region the user is located in is not supported. |
| `ERROR_CODE_GUEST_REGION_FORBIDDEN` | The user is located in a region that is not supported. |
| `ERROR_CODE_GUEST_PERMISSION_DENIED` | The user has been blocked from using onramp. |
| `ERROR_CODE_GUEST_CARD_PREPAID_DECLINED` | The user tried to pay with a prepaid debit card, which is unsupported. |
| `ERROR_CODE_GUEST_TRANSACTION_LIMIT` | This transaction would exceed the user’s weekly transaction limit. |
| `ERROR_CODE_GUEST_TRANSACTION_COUNT` | This transaction would exceed the user’s lifetime transaction count limit (currently 15). |
| `ERROR_CODE_GUEST_DAILY_TRANSACTION_COUNT` | This transaction would exceed the user’s daily transaction count limit of successful transactions (currently 10). |
| `ERROR_CODE_INVALID_BILLING_ZIP` | The billing address ZIP code provided by the payment method could not be validated. |
| `ERROR_CODE_INVALID_BILLING_ADDRESS` | The billing address provided by the payment method is incomplete. |
| `ERROR_CODE_INVALID_BILLING_NAME` | The cardholder name is invalid or may contain unsupported characters. |
Emitted if the user cancels the payment popup.
If you keep the webview active in your app after receiving the `onramp_api.commit_success` message, the webview will poll our transaction status API automatically and report success or failure via the following two events.
Emitted if the transaction completed successfully and funds have been sent to the destination wallet address.
Emitted if there was an error processing the transaction. Some possible error codes are listed below.
| Error Code | Description |
| ---------------------------------------------------- | ------------------------------------------------------------------------------------------------------------------------------------------------------------------------------------------------------ |
| `ERROR_CODE_GUEST_TRANSACTION_BUY_FAILED` | We were unable to complete the crypto purchase, likely due to a failed risk check. The user’s card will not be charged. |
| `ERROR_CODE_GUEST_TRANSACTION_SEND_FAILED` | We were unable to send the funds to the user’s destination address, the user’s card will be refunded. |
| `ERROR_CODE_GUEST_TRANSACTION_TRANSACTION_FAILED` | An internal error has occurred in Coinbase services, the Onramp team will be automatically notified to investigate. |
| `ERROR_CODE_GUEST_TRANSACTION_AVS_VALIDATION_FAILED` | We were unable to process the transaction due to failure to validate the user’s billing address. Ask the user to verify their billing address with the bank card. The user’s card will not be charged. |
## Order lifecycle
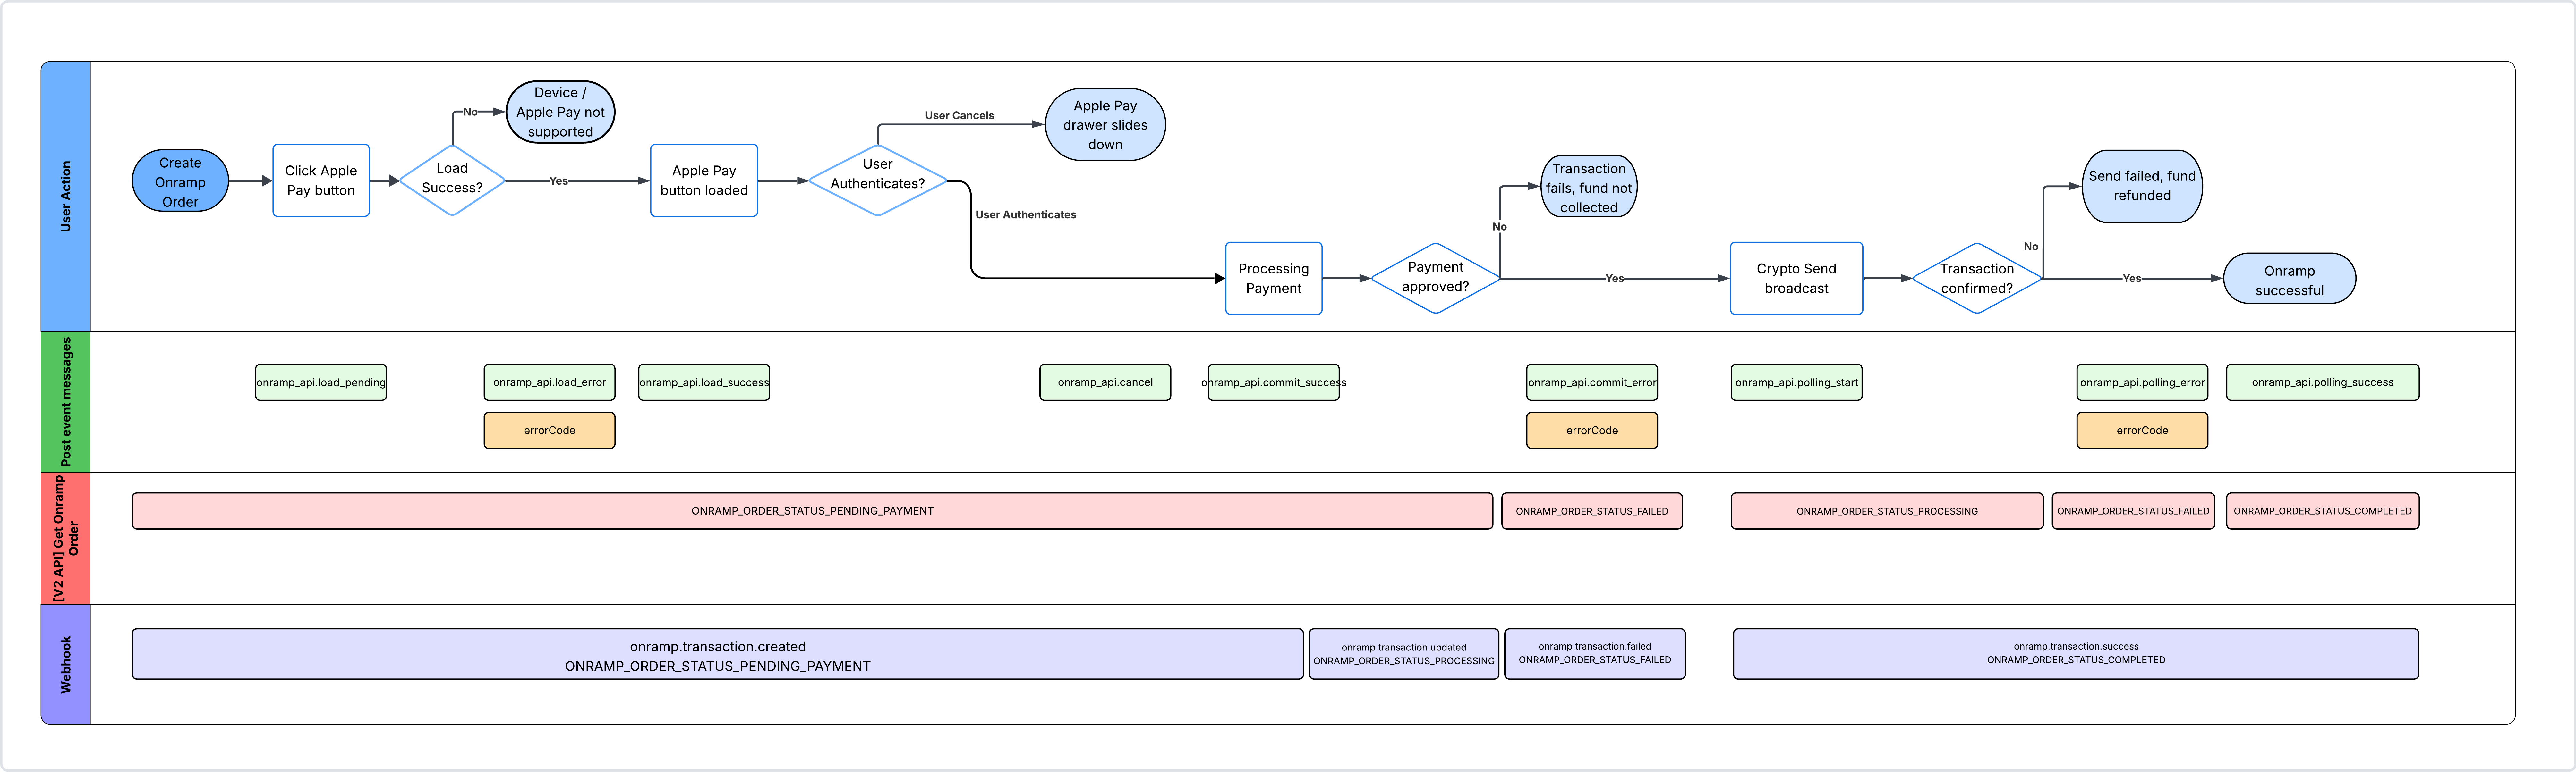
The following diagram shows the complete order lifecycle from order creation through settlement,
including the corresponding post message events and API order statuses at each stage.
 ### Integration guide
#### Tracking transactions
When tracking transactions in your database, create and record transaction when you receive the
`onramp.transaction.updated` event (`ONRAMP_ORDER_STATUS_PROCESSING`) after user has authenticated and committed payment.
This ensures your records reflect only committed transactions, and not potentially abandoned workflow.
#### Handling user cancellation
Webhook event does not emit a terminal failure status when a user abandons the payment flow on the front-end without
completing it. Order will remain in Processing on your backend indefinitely.
If your integration records orders before the `PROCESSING` status, implement your own timeout
mechanism to handle this case.
If user completes the created payment after your timeout has expired, the transaction will still
be processed and captured. You can reconcile any completed transactions by calling the
[Get all onramp transactions](/api-reference/rest-api/onramp-offramp/get-all-onramp-transactions) API.
## Testing
Use your **production** CDP API key for the Headless Onramp API. The CDP Portal Sandbox environment does not apply.
You can test your integration with the Headless Onramp API by creating sandbox orders. To create a sandbox order, just
prefix the `partnerUserRef` parameter in your call to the [Create Onramp Order API](/api-reference/v2/rest-api/onramp/create-an-onramp-order#body-partner-user-ref)
with the string `sandbox-`. Doing so will result in your transaction always succeeding, but your debit card will never be charged.
For the `phoneNumber` parameter, you can use any random phone number, as long as it's in a valid US phone number format (example: +1 international code + US area code + 7 digit number; +12345678901)
### Web app testing
When using a `partnerUserRef` prefixed with `sandbox-`, embedding the payment link is always allowed on `http://localhost` (for local web or iOS simulator testing) and `http://10.0.2.2` (for Android emulator testing), so no domain registration is required for local testing.
You must also append a sandbox query parameter to the payment link URL — this is required for local dev embedding and replaces the real payment sheet with a fake popup. Use the parameter that matches the payment method in your API request:
* For Apple Pay: append `&useApplePaySandbox=true`
* For Google Pay: append `&useGooglePaySandbox=true`
### Android app testing
You can test Google Pay in your Android app without production approval by using the sandbox order flow described above. The Google Pay test suite allows you to validate your WebView integration before submitting your app for approval. See the [Google Pay test and deploy guide](https://developers.google.com/pay/api/android/guides/test-and-deploy/integration-checklist) for details.
## Troubleshooting
* When integrating via iframe, make sure to include the `allow=payment` attribute on the iframe element.
* For Android WebView integrations, ensure that `javaScriptEnabled` is set to `true` and `PaymentRequestEnabled` is set to `true` on your `WebSettings`.
* If Google Pay is not appearing on a test device, verify that the device meets Google's [minimum requirements](https://developers.google.com/pay/api/android/guides/recipes/using-android-webview).
* Mobile integrations (iOS and Android) may not function properly if your app is not subscribed to post message events. This applies even during local testing — ensure your post message listener is wired up before loading the payment link.
## Reference Implementation
To explore our full set of Onramp demo applications across web, backend, and mobile, see the [Onramp demo app collateral](/get-started/demo-apps/starter/onramp-demo-app).
For a web reference implementation showing how Apple Pay can be embedded directly in your web app, see the [Apple Pay web demo source code](https://github.com/coinbase/onramp-demo-application).
For a full React Native / Expo mobile reference implementation that showcases the Onramp v2 API, CDP Wallets, and Apple Pay integration, see the [Onramp v2 mobile demo app source code](https://github.com/coinbase/onramp-v2-mobile-demo/).
For native iOS implementations, see our [iOS WKWebView demo](https://github.com/coinbase/onramp-v2-mobile-demo/tree/master/standalone-sample/ios-native-wkwebview) which shows how to embed the Apple Pay flow in a native app using WKWebView and handle payment events through the `cbOnramp` message handler.
## Embedded orders
**Embedded orders require account enablement.** Contact your Coinbase representative or [apply for Onramp access](https://support.cdp.coinbase.com/onramp-onboarding) to get started.
Use embedded orders when you want Coinbase to collect the user's phone number, email address, one-time passwords, and any identity information needed for a limits upgrade. Your backend creates the order, then your app loads the returned Coinbase-hosted URL in an iframe or webview; Coinbase determines which screens the user needs and advances the flow through verification, limits, and payment. The platform, domain, user-gesture, legal, and mobile-webview requirements above still apply.
### How it works
Call the [Create Onramp Order API](/api-reference/v2/rest-api/onramp/create-an-onramp-order) without including `phoneNumber`, `email`, `agreementAcceptedAt`, `phoneNumberVerifiedAt`, `smsVerificationId`, and `emailVerificationId`. Note that the embedded order experience emits additional post message events.
To preview pricing before starting the hosted flow, call `POST /v2/onramp/orders` with `isQuote: true` while continuing to omit `phoneNumber` and `email`. The response contains the pricing fields, but no usable order is reserved and no `paymentLink` or `userAuthToken` is returned. When the user is ready to continue, make a new request with `isQuote: false`.
### Reduce repeat verification with `userAuthToken`
When you create an embedded order, Coinbase returns a `userAuthToken` in the response; the standard flow does not return one. Store it securely on your backend as soon as you receive the response, associated with that user and replacing any older value. A user may have only one `userAuthToken` at any given time. The token contains no PII and becomes usable only after the user completes both phone and email verification—you do not need to wait for the purchase itself to finish. It remains valid for 60 days.
On a later purchase to the same wallet, pass the saved token in the [Onramp Order API](/api-reference/v2/rest-api/onramp/create-an-onramp-order). If it is valid, the user skips OTP and the response returns the same token. The hosted flow checks limits separately, so the user may still need to complete a limits upgrade before payment.
In the case of passing an expired or invalid token, the request does not fail. Coinbase returns a new token and shows the required OTP steps. Store the new value in place of the previous token for that user.
### Additional post message events
Embedded orders keep the existing [payment post message events](#post-message-events) and add the four events below. Verification and limits progress events do not require a response from your app; `session_error` means the current hosted session cannot continue.
Emitted after the user's phone number and email address are verified.
Emitted after the user successfully submits the limits-upgrade form.
Emitted after the limits upgrade is approved and the hosted flow can continue to payment.
Emitted when a terminal verification, limits, or order-preparation error must be surfaced to your app. The event includes `data.errorCode` and `data.errorMessage`.
Coinbase handles recoverable errors inside the hosted experience. Incorrect or expired OTPs, invalid identity input, pending limits review, and temporary connection errors do not emit `session_error`; the user can retry or continue in the same session.
The possible error codes are:
| Error Code | Description |
| ------------------------------------ | ------------------------------------------------------------------------------------------------------------------------------------------------------------------------------------------------------------- |
| `ERROR_CODE_INTERNAL` | Verification, order preparation, or the hosted session encountered an unrecoverable error. Close the hosted session and create a new order. Contact support if the problem continues. |
| `ERROR_CODE_GUEST_TRANSACTION_LIMIT` | The purchase cannot continue because of the current limits decision. This code does not identify the underlying weekly or lifetime limit. End this attempt and let the user try again later when appropriate. |
| `ERROR_CODE_GUEST_TRANSACTION_COUNT` | Transaction creation reported that the user reached the lifetime transaction-count limit. End this attempt; retrying the same order will not help unless the user's limits change. |
| `ERROR_CODE_LIMITS_UPGRADE_BLOCKED` | The user's limits upgrade cannot proceed. Stop the flow and do not repeatedly prompt the user to submit identity information. |
### Track order status
Until the user passes OTP verification and, if required, completes the limits-upgrade form, Create Order and Get Order return `ONRAMP_ORDER_STATUS_PENDING_VERIFICATION`. No transaction webhook is emitted in this state.
After those steps, the order moves to `ONRAMP_ORDER_STATUS_PENDING_PAYMENT`, emits `onramp.transaction.created`, and follows the standard [order lifecycle](#order-lifecycle). If the user leaves before then, no transaction webhook is emitted.
### Sandbox testing
Start with the standard [sandbox setup](#testing), including the `sandbox-` partner user reference and payment-method URL parameter. Embedded orders add deterministic verification and limits behavior:
* Use any phone number beginning with `+1000`, such as `+10005550100`, and any email ending in `@sandbox.test`, such as `tester@sandbox.test`.
* No SMS or email is sent. Enter `000000` for both one-time passwords.
* Omit `userAuthToken` to show both contact-verification screens. A valid reusable token skips them.
* The limits-upgrade form always appears. Enter any syntactically valid SSN last four digits and date of birth; the upgrade always succeeds.
### Integration guide
#### Tracking transactions
When tracking transactions in your database, create and record transaction when you receive the
`onramp.transaction.updated` event (`ONRAMP_ORDER_STATUS_PROCESSING`) after user has authenticated and committed payment.
This ensures your records reflect only committed transactions, and not potentially abandoned workflow.
#### Handling user cancellation
Webhook event does not emit a terminal failure status when a user abandons the payment flow on the front-end without
completing it. Order will remain in Processing on your backend indefinitely.
If your integration records orders before the `PROCESSING` status, implement your own timeout
mechanism to handle this case.
If user completes the created payment after your timeout has expired, the transaction will still
be processed and captured. You can reconcile any completed transactions by calling the
[Get all onramp transactions](/api-reference/rest-api/onramp-offramp/get-all-onramp-transactions) API.
## Testing
Use your **production** CDP API key for the Headless Onramp API. The CDP Portal Sandbox environment does not apply.
You can test your integration with the Headless Onramp API by creating sandbox orders. To create a sandbox order, just
prefix the `partnerUserRef` parameter in your call to the [Create Onramp Order API](/api-reference/v2/rest-api/onramp/create-an-onramp-order#body-partner-user-ref)
with the string `sandbox-`. Doing so will result in your transaction always succeeding, but your debit card will never be charged.
For the `phoneNumber` parameter, you can use any random phone number, as long as it's in a valid US phone number format (example: +1 international code + US area code + 7 digit number; +12345678901)
### Web app testing
When using a `partnerUserRef` prefixed with `sandbox-`, embedding the payment link is always allowed on `http://localhost` (for local web or iOS simulator testing) and `http://10.0.2.2` (for Android emulator testing), so no domain registration is required for local testing.
You must also append a sandbox query parameter to the payment link URL — this is required for local dev embedding and replaces the real payment sheet with a fake popup. Use the parameter that matches the payment method in your API request:
* For Apple Pay: append `&useApplePaySandbox=true`
* For Google Pay: append `&useGooglePaySandbox=true`
### Android app testing
You can test Google Pay in your Android app without production approval by using the sandbox order flow described above. The Google Pay test suite allows you to validate your WebView integration before submitting your app for approval. See the [Google Pay test and deploy guide](https://developers.google.com/pay/api/android/guides/test-and-deploy/integration-checklist) for details.
## Troubleshooting
* When integrating via iframe, make sure to include the `allow=payment` attribute on the iframe element.
* For Android WebView integrations, ensure that `javaScriptEnabled` is set to `true` and `PaymentRequestEnabled` is set to `true` on your `WebSettings`.
* If Google Pay is not appearing on a test device, verify that the device meets Google's [minimum requirements](https://developers.google.com/pay/api/android/guides/recipes/using-android-webview).
* Mobile integrations (iOS and Android) may not function properly if your app is not subscribed to post message events. This applies even during local testing — ensure your post message listener is wired up before loading the payment link.
## Reference Implementation
To explore our full set of Onramp demo applications across web, backend, and mobile, see the [Onramp demo app collateral](/get-started/demo-apps/starter/onramp-demo-app).
For a web reference implementation showing how Apple Pay can be embedded directly in your web app, see the [Apple Pay web demo source code](https://github.com/coinbase/onramp-demo-application).
For a full React Native / Expo mobile reference implementation that showcases the Onramp v2 API, CDP Wallets, and Apple Pay integration, see the [Onramp v2 mobile demo app source code](https://github.com/coinbase/onramp-v2-mobile-demo/).
For native iOS implementations, see our [iOS WKWebView demo](https://github.com/coinbase/onramp-v2-mobile-demo/tree/master/standalone-sample/ios-native-wkwebview) which shows how to embed the Apple Pay flow in a native app using WKWebView and handle payment events through the `cbOnramp` message handler.
## Embedded orders
**Embedded orders require account enablement.** Contact your Coinbase representative or [apply for Onramp access](https://support.cdp.coinbase.com/onramp-onboarding) to get started.
Use embedded orders when you want Coinbase to collect the user's phone number, email address, one-time passwords, and any identity information needed for a limits upgrade. Your backend creates the order, then your app loads the returned Coinbase-hosted URL in an iframe or webview; Coinbase determines which screens the user needs and advances the flow through verification, limits, and payment. The platform, domain, user-gesture, legal, and mobile-webview requirements above still apply.
### How it works
Call the [Create Onramp Order API](/api-reference/v2/rest-api/onramp/create-an-onramp-order) without including `phoneNumber`, `email`, `agreementAcceptedAt`, `phoneNumberVerifiedAt`, `smsVerificationId`, and `emailVerificationId`. Note that the embedded order experience emits additional post message events.
To preview pricing before starting the hosted flow, call `POST /v2/onramp/orders` with `isQuote: true` while continuing to omit `phoneNumber` and `email`. The response contains the pricing fields, but no usable order is reserved and no `paymentLink` or `userAuthToken` is returned. When the user is ready to continue, make a new request with `isQuote: false`.
### Reduce repeat verification with `userAuthToken`
When you create an embedded order, Coinbase returns a `userAuthToken` in the response; the standard flow does not return one. Store it securely on your backend as soon as you receive the response, associated with that user and replacing any older value. A user may have only one `userAuthToken` at any given time. The token contains no PII and becomes usable only after the user completes both phone and email verification—you do not need to wait for the purchase itself to finish. It remains valid for 60 days.
On a later purchase to the same wallet, pass the saved token in the [Onramp Order API](/api-reference/v2/rest-api/onramp/create-an-onramp-order). If it is valid, the user skips OTP and the response returns the same token. The hosted flow checks limits separately, so the user may still need to complete a limits upgrade before payment.
In the case of passing an expired or invalid token, the request does not fail. Coinbase returns a new token and shows the required OTP steps. Store the new value in place of the previous token for that user.
### Additional post message events
Embedded orders keep the existing [payment post message events](#post-message-events) and add the four events below. Verification and limits progress events do not require a response from your app; `session_error` means the current hosted session cannot continue.
Emitted after the user's phone number and email address are verified.
Emitted after the user successfully submits the limits-upgrade form.
Emitted after the limits upgrade is approved and the hosted flow can continue to payment.
Emitted when a terminal verification, limits, or order-preparation error must be surfaced to your app. The event includes `data.errorCode` and `data.errorMessage`.
Coinbase handles recoverable errors inside the hosted experience. Incorrect or expired OTPs, invalid identity input, pending limits review, and temporary connection errors do not emit `session_error`; the user can retry or continue in the same session.
The possible error codes are:
| Error Code | Description |
| ------------------------------------ | ------------------------------------------------------------------------------------------------------------------------------------------------------------------------------------------------------------- |
| `ERROR_CODE_INTERNAL` | Verification, order preparation, or the hosted session encountered an unrecoverable error. Close the hosted session and create a new order. Contact support if the problem continues. |
| `ERROR_CODE_GUEST_TRANSACTION_LIMIT` | The purchase cannot continue because of the current limits decision. This code does not identify the underlying weekly or lifetime limit. End this attempt and let the user try again later when appropriate. |
| `ERROR_CODE_GUEST_TRANSACTION_COUNT` | Transaction creation reported that the user reached the lifetime transaction-count limit. End this attempt; retrying the same order will not help unless the user's limits change. |
| `ERROR_CODE_LIMITS_UPGRADE_BLOCKED` | The user's limits upgrade cannot proceed. Stop the flow and do not repeatedly prompt the user to submit identity information. |
### Track order status
Until the user passes OTP verification and, if required, completes the limits-upgrade form, Create Order and Get Order return `ONRAMP_ORDER_STATUS_PENDING_VERIFICATION`. No transaction webhook is emitted in this state.
After those steps, the order moves to `ONRAMP_ORDER_STATUS_PENDING_PAYMENT`, emits `onramp.transaction.created`, and follows the standard [order lifecycle](#order-lifecycle). If the user leaves before then, no transaction webhook is emitted.
### Sandbox testing
Start with the standard [sandbox setup](#testing), including the `sandbox-` partner user reference and payment-method URL parameter. Embedded orders add deterministic verification and limits behavior:
* Use any phone number beginning with `+1000`, such as `+10005550100`, and any email ending in `@sandbox.test`, such as `tester@sandbox.test`.
* No SMS or email is sent. Enter `000000` for both one-time passwords.
* Omit `userAuthToken` to show both contact-verification screens. A valid reusable token skips them.
* The limits-upgrade form always appears. Enter any syntactically valid SSN last four digits and date of birth; the upgrade always succeeds.