> ## Documentation Index
> Fetch the complete documentation index at: https://docs.cdp.coinbase.com/llms.txt
> Use this file to discover all available pages before exploring further.
# 1. Import Stash and Fund Polkadot UI with DOT
To import stash using a controller...
## 1. Import your Stash
The current version of the Polkadot.js extension requires that you create an account before importing your own stash account. You can delete this account after importing your stash.
### Create Account
1. Install the [**Polkadot.js extension**](https://chrome.google.com/webstore/detail/polkadot%7Bjs%7D-extension/mopnmbcafieddcagagdcbnhejhlodfdd?hl=en).
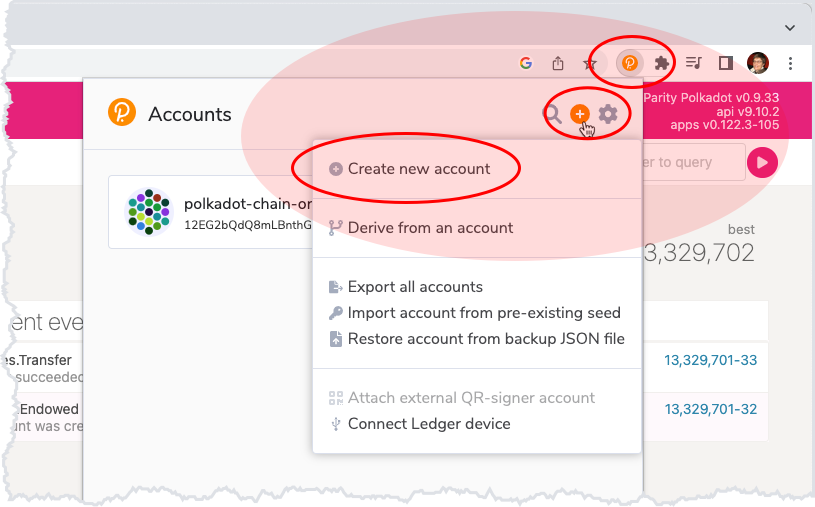
2. Click the extension icon in your browser.
3. Click **+** to add an account.
4. Copy the provided mnemonic seed phrase.
 Ensure that you store your mnemonic seed phrase somewhere safe where it cannot be lost or compromised. Your mnemonic seed phrase is the master key to your wallet; loss or compromise of your mnemonic seed phrase may result in permanent loss of your DOT.
5. Enter a name and password for your account.
6. Click **Add the account with the generated seed** to create the account.
### Import Stash Account
1. Click the plus sign (+) in the top right corner.
2. Click **Import account from pre-existing seed**.
3. Enter the mnemonic seed for your Stash account.
4. Enter a name and password for your account.
5. Click **Add the account with the supplied seed**.
## 2. Import or Create your Controller
You can use your Stash as your Controller, but for security reasons, the Polkadot team recommends you create a separate Controller address.
If you are importing an existing controller account, repeat [**Import Stash Account**](#import-stash-account) above, but with your Controller account information.
1. Open the Polkadot.js extension.
2. Click the plus sign (+).
3. Click **Create New Account**.
4. Enter the password for your Stash account.
5. Click **Create derived account**.
6. Name the Controller account.
7. Create a password and verify it.
8. Click **Create derived account**.
9. Save your mnemonic seed phrase in a safe place.
Ensure that you store your mnemonic seed phrase somewhere safe where it cannot be lost or compromised. Your mnemonic seed phrase is the master key to your Controller account; loss or compromise of your mnemonic seed phrase may result in permanent loss of your DOT.
## 3. Transfer DOT to your Controller to pay for transaction fees
If your Controller account already has at least 5-10 DOTs in it, skip to [**2: Stake DOT to Coinbase with Polkadot UI**](/staking/staking-delegation-guides/polkadot/polkadot-ui-live/stake-with-polkadot-ui).
1. Go to the [**Polkadot UI**](https://polkadot.js.org/apps/).
2. Click **TRANSFER** under **ACCOUNTS** in the top navigation.
3. Select your Stash as the **Send from** account.
4. Select your Controller as the **Send to** address.
5. Enter the amount of DOTs you want to transfer to your Controller.
You need 1 DOT for your "existential deposit" (the minimum balance the network requires to keep your account open), and 5-10 DOTs to cover transaction fees.
6. Click **Make Transfer**.
7. Click **Sign and Submit**.
8. Enter your Stash password in the pop-up.
9. Click **Sign the transaction**.
## To import stash using a Ledger hardware device...
### Prerequisites
* The Polkadot app is installed on your Ledger S or X hardware device.
* You are using Google Chrome or an equivalent browser.
## 1. Import your Stash
1. Plug your Ledger hardware wallet device into your computer, unlock the Ledger, and navigate to the Polkadot app.
2. Navigate to the Settings tab of the [**Polkadot-JS app**](https://polkadot.js.org/apps/#/settings).
Ensure that you store your mnemonic seed phrase somewhere safe where it cannot be lost or compromised. Your mnemonic seed phrase is the master key to your wallet; loss or compromise of your mnemonic seed phrase may result in permanent loss of your DOT.
5. Enter a name and password for your account.
6. Click **Add the account with the generated seed** to create the account.
### Import Stash Account
1. Click the plus sign (+) in the top right corner.
2. Click **Import account from pre-existing seed**.
3. Enter the mnemonic seed for your Stash account.
4. Enter a name and password for your account.
5. Click **Add the account with the supplied seed**.
## 2. Import or Create your Controller
You can use your Stash as your Controller, but for security reasons, the Polkadot team recommends you create a separate Controller address.
If you are importing an existing controller account, repeat [**Import Stash Account**](#import-stash-account) above, but with your Controller account information.
1. Open the Polkadot.js extension.
2. Click the plus sign (+).
3. Click **Create New Account**.
4. Enter the password for your Stash account.
5. Click **Create derived account**.
6. Name the Controller account.
7. Create a password and verify it.
8. Click **Create derived account**.
9. Save your mnemonic seed phrase in a safe place.
Ensure that you store your mnemonic seed phrase somewhere safe where it cannot be lost or compromised. Your mnemonic seed phrase is the master key to your Controller account; loss or compromise of your mnemonic seed phrase may result in permanent loss of your DOT.
## 3. Transfer DOT to your Controller to pay for transaction fees
If your Controller account already has at least 5-10 DOTs in it, skip to [**2: Stake DOT to Coinbase with Polkadot UI**](/staking/staking-delegation-guides/polkadot/polkadot-ui-live/stake-with-polkadot-ui).
1. Go to the [**Polkadot UI**](https://polkadot.js.org/apps/).
2. Click **TRANSFER** under **ACCOUNTS** in the top navigation.
3. Select your Stash as the **Send from** account.
4. Select your Controller as the **Send to** address.
5. Enter the amount of DOTs you want to transfer to your Controller.
You need 1 DOT for your "existential deposit" (the minimum balance the network requires to keep your account open), and 5-10 DOTs to cover transaction fees.
6. Click **Make Transfer**.
7. Click **Sign and Submit**.
8. Enter your Stash password in the pop-up.
9. Click **Sign the transaction**.
## To import stash using a Ledger hardware device...
### Prerequisites
* The Polkadot app is installed on your Ledger S or X hardware device.
* You are using Google Chrome or an equivalent browser.
## 1. Import your Stash
1. Plug your Ledger hardware wallet device into your computer, unlock the Ledger, and navigate to the Polkadot app.
2. Navigate to the Settings tab of the [**Polkadot-JS app**](https://polkadot.js.org/apps/#/settings).
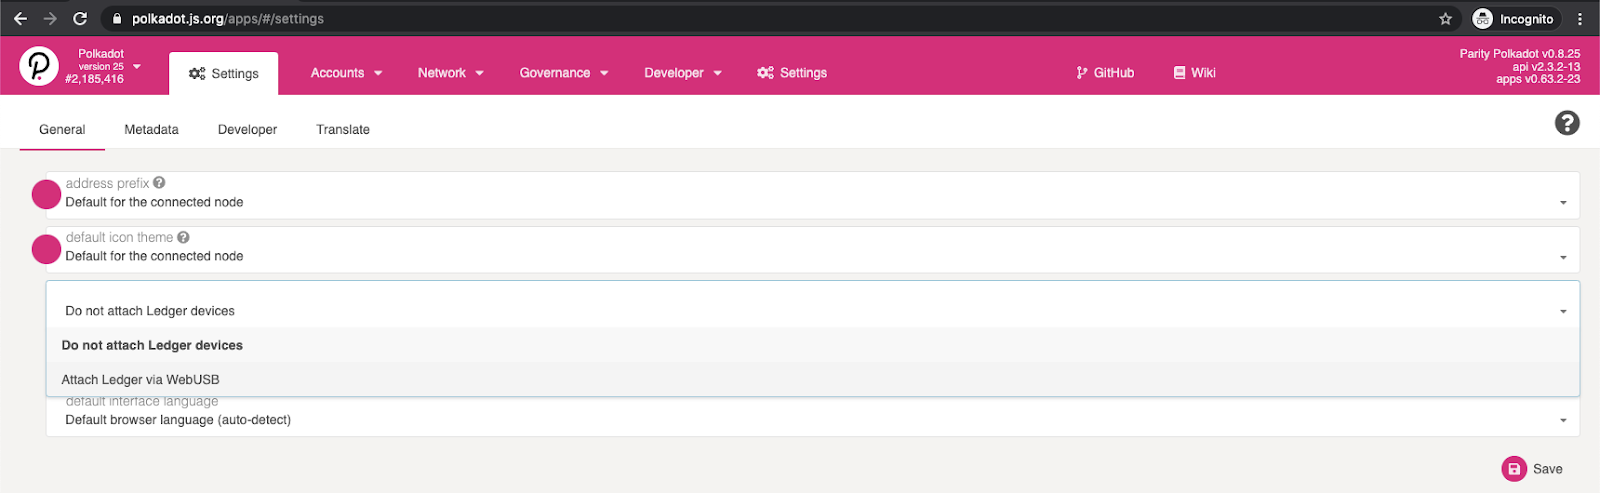 3. Select **Attach Ledger via WebUSB** and select **Save**.
4. Navigate to the **Accounts** tab of the [**Polkadot-JS app**](https://polkadot.js.org/apps/#/accounts).
5. Select **Add via Ledger**.
6. Assign an arbitrary name to your account.
7. Leave the standard settings so that the `Account Type = 0` and the `Address Index = 0`. For more, see **[Using the Polkadot Ledger Application](https://wiki.polkadot.network/docs/learn-ledger)**.
8. Select **Save**.
9. Ensure your Ledger is unlocked and that the Polkadot app is open on it.
10. Select your Ledger from the connection list and select **Connect**.
11. Select **Show address on hardware device** from the 3-dot hamburger menu on your Ledger address. Your account address displays on your Ledger.
12. Click on any of the block explorers to the right of the 3-dot menu. This opens an explorer view of your address.
13. Confirm the address that the explorer opens with the address on your Ledger.
14. If they match, like the right button one time on your Ledger device to approve the address.
15. To send your DOTs to your new Ledger account, select the name of your account from your account list in the Polkadot UI.
16. In the pop-up sidebar, click the multicolored icon above your account name to copy your account address.
17. Send your DOTs from where they are stored to this address. Your DOT balance should now show in the Polkadot UI.
3. Select **Attach Ledger via WebUSB** and select **Save**.
4. Navigate to the **Accounts** tab of the [**Polkadot-JS app**](https://polkadot.js.org/apps/#/accounts).
5. Select **Add via Ledger**.
6. Assign an arbitrary name to your account.
7. Leave the standard settings so that the `Account Type = 0` and the `Address Index = 0`. For more, see **[Using the Polkadot Ledger Application](https://wiki.polkadot.network/docs/learn-ledger)**.
8. Select **Save**.
9. Ensure your Ledger is unlocked and that the Polkadot app is open on it.
10. Select your Ledger from the connection list and select **Connect**.
11. Select **Show address on hardware device** from the 3-dot hamburger menu on your Ledger address. Your account address displays on your Ledger.
12. Click on any of the block explorers to the right of the 3-dot menu. This opens an explorer view of your address.
13. Confirm the address that the explorer opens with the address on your Ledger.
14. If they match, like the right button one time on your Ledger device to approve the address.
15. To send your DOTs to your new Ledger account, select the name of your account from your account list in the Polkadot UI.
16. In the pop-up sidebar, click the multicolored icon above your account name to copy your account address.
17. Send your DOTs from where they are stored to this address. Your DOT balance should now show in the Polkadot UI.